Showing posts with label biscuit. Show all posts

2 August 2014

Nigella Challenge: Snickerdoodles

These are an unassuming biscuit, but don't underestimate them. They taste like delicious cinnamon doughnuts. What's not to like? Nigella even  calls them "oven-baked doughnuts".

I always find myself drawn to baked goods that don't look like much, but you discover they're are the tastiest little morsels once you've eaten them. They become my little secret, and nobody else will give them a try, so more for me! I have a great jam-topped sponge recipe that does the same - I won over an initially unimpressed university class with it. I've made these little biscuits a few times now too (they're very quick, easy and even a badly stocked pantry probably has the ingredients!) and they always manage to disappear at a rapid rate.

They're golden, crumbly and go very well with a nice cup of tea - so they tick all my boxes when it comes to biscuits.

  • 250g plain flour
  • 1/2 tsp nutmeg
  • 3/4 tsp baking powder
  • 125g butter, softened 
  • 100g caster sugar, plus 2 tbsp for rolling
  • 1 egg
  • 1 tsp vanilla extract
  • 1 tbsp cinnamon
Preheat your oven to 180C and line 2 large baking sheets.

Combine the flour, nutmeg and baking powder in a bowl, and then set it aside. 

Cream the butter and 100g sugar until pale in an electric mixer. Add the egg and vanilla. Turn your mixer down (to avoid a flour mushroom cloud) and gradually add the flour mixture. 

Combine the 2 tbsp sugar and cinnamon on a small plate. Roll teaspoonfuls of the dough (roughly the size of a walnut) into balls, and then roll it in the cinnamon sugar. Place them on the baking sheets. No need to flatten them at all - you want them as nice little domes once baked. 

Bake for 15 minutes, until lighlty golden brown. Remove to wire racks to cool. They will still be a little soft, but like all biscuits they firm up as they cool. 

As a variation, Nigella suggests replacing 25g flour with cocoa to may "chocodoodles". This sounds delicious, but I am yet to attempt them. Have a go and let me know if anyone does. 


16 July 2014

Nigella Challenge: Sweet & Salty Peanut Biscuits

I can't actually eat these, and to be honest, I'm not tempted - but all reports point to them being delicious. That perfect combination of sweet and salty that's made salted caramel the current food-de-jour that seems to be staying the distance. What is it about that combination? Is it as simple as its ability to satisfy all our "bad" food cravings? Whatever it is, I've jumped wholeheartedly on the bandwagon!

Nigella actually refers to these as her favourite biscuits - i kid you not. She likes them as the bread in an ice-cream sandwich. She also presses the importance of using vegetable shortening (I used copha) to give them lightness, and I certainly agree.

I am harbouring ambitions to make a cashew version of these to explore further their possibilities.

  • 75g brown sugar, plus extra for sprinkling
  • 100g unsalted butter, softened
  • 50g vegetable shortening, at room temperature
  • 1 egg
  • 1 tsp vanilla extract
  • 175g self-raising flour
  • 125g salted peanuts
Preheat oven 190C. Line 2 large baking sheets.
In the large bowl of an electric mixer combine the sugar, butter, shortening, egg and vanilla. You aren't creaming this, merely combining. You could do this with a wooden spoon, but the mixer makes it far easier (it is much easier to do this next step with a spoon however). Add the flour and nuts, mixing well to combine.
Drop teaspoonfuls of the dough onto the trays about 5cm apart.
Now this is the most complicated step: oil the bottom of a glass and dip into the extra brown sugar. Press this down on the dough to flatten the tops.
Bake 8-10 mins. Cool on a wire rack (if you can resist the temptation).


8 January 2014

Nigella Challenge: Coffee & Walnut Splodge Biscuits

I am not a coffee person. For a little while when I first started university I tried to convince myself I was, but I felt like such a fraud. And back to my tea pots I went.

However, I seem to like it in baked goods and desserts. Really, who could resist a tiramisu? These cakey biscuits would be a delightful accompaniment for coffee (I imagine), but they aren't quite so good with tea.

They are an absolute doddle to make. Hardly any ingredients, but the espresso powder is crucial for the proper taste. You'll find it easily in the supermarket, and it is the best thing to use any time dried coffee is called for.
  • 250g plain flour
  • 1 tsp baking powder
  • 200g butter, softened
  • 75g caster sugar
  • 60g brown sugar
  • 2 tbsp instant espresso powder
  • 2 eggs
  • 200g walnuts, roughly chopped
Preheat oven to 180C. Line a couple of baking sheets with baking paper.

Cream butter and sugars with an electric mix master. Add coffee, and then eggs.

Gently fold in flour, baking powder and walnuts. Mix until just combined - you don't want to over mix or you'll have tough cookies.

Drop tablespoonfuls of the sticky mixture onto baking trays, leaving 4-5cm between them as they spread considerably. Bake for 12 minutes until golden and firm to touch. Cool on a rack.


5 January 2014

Monte Carlos

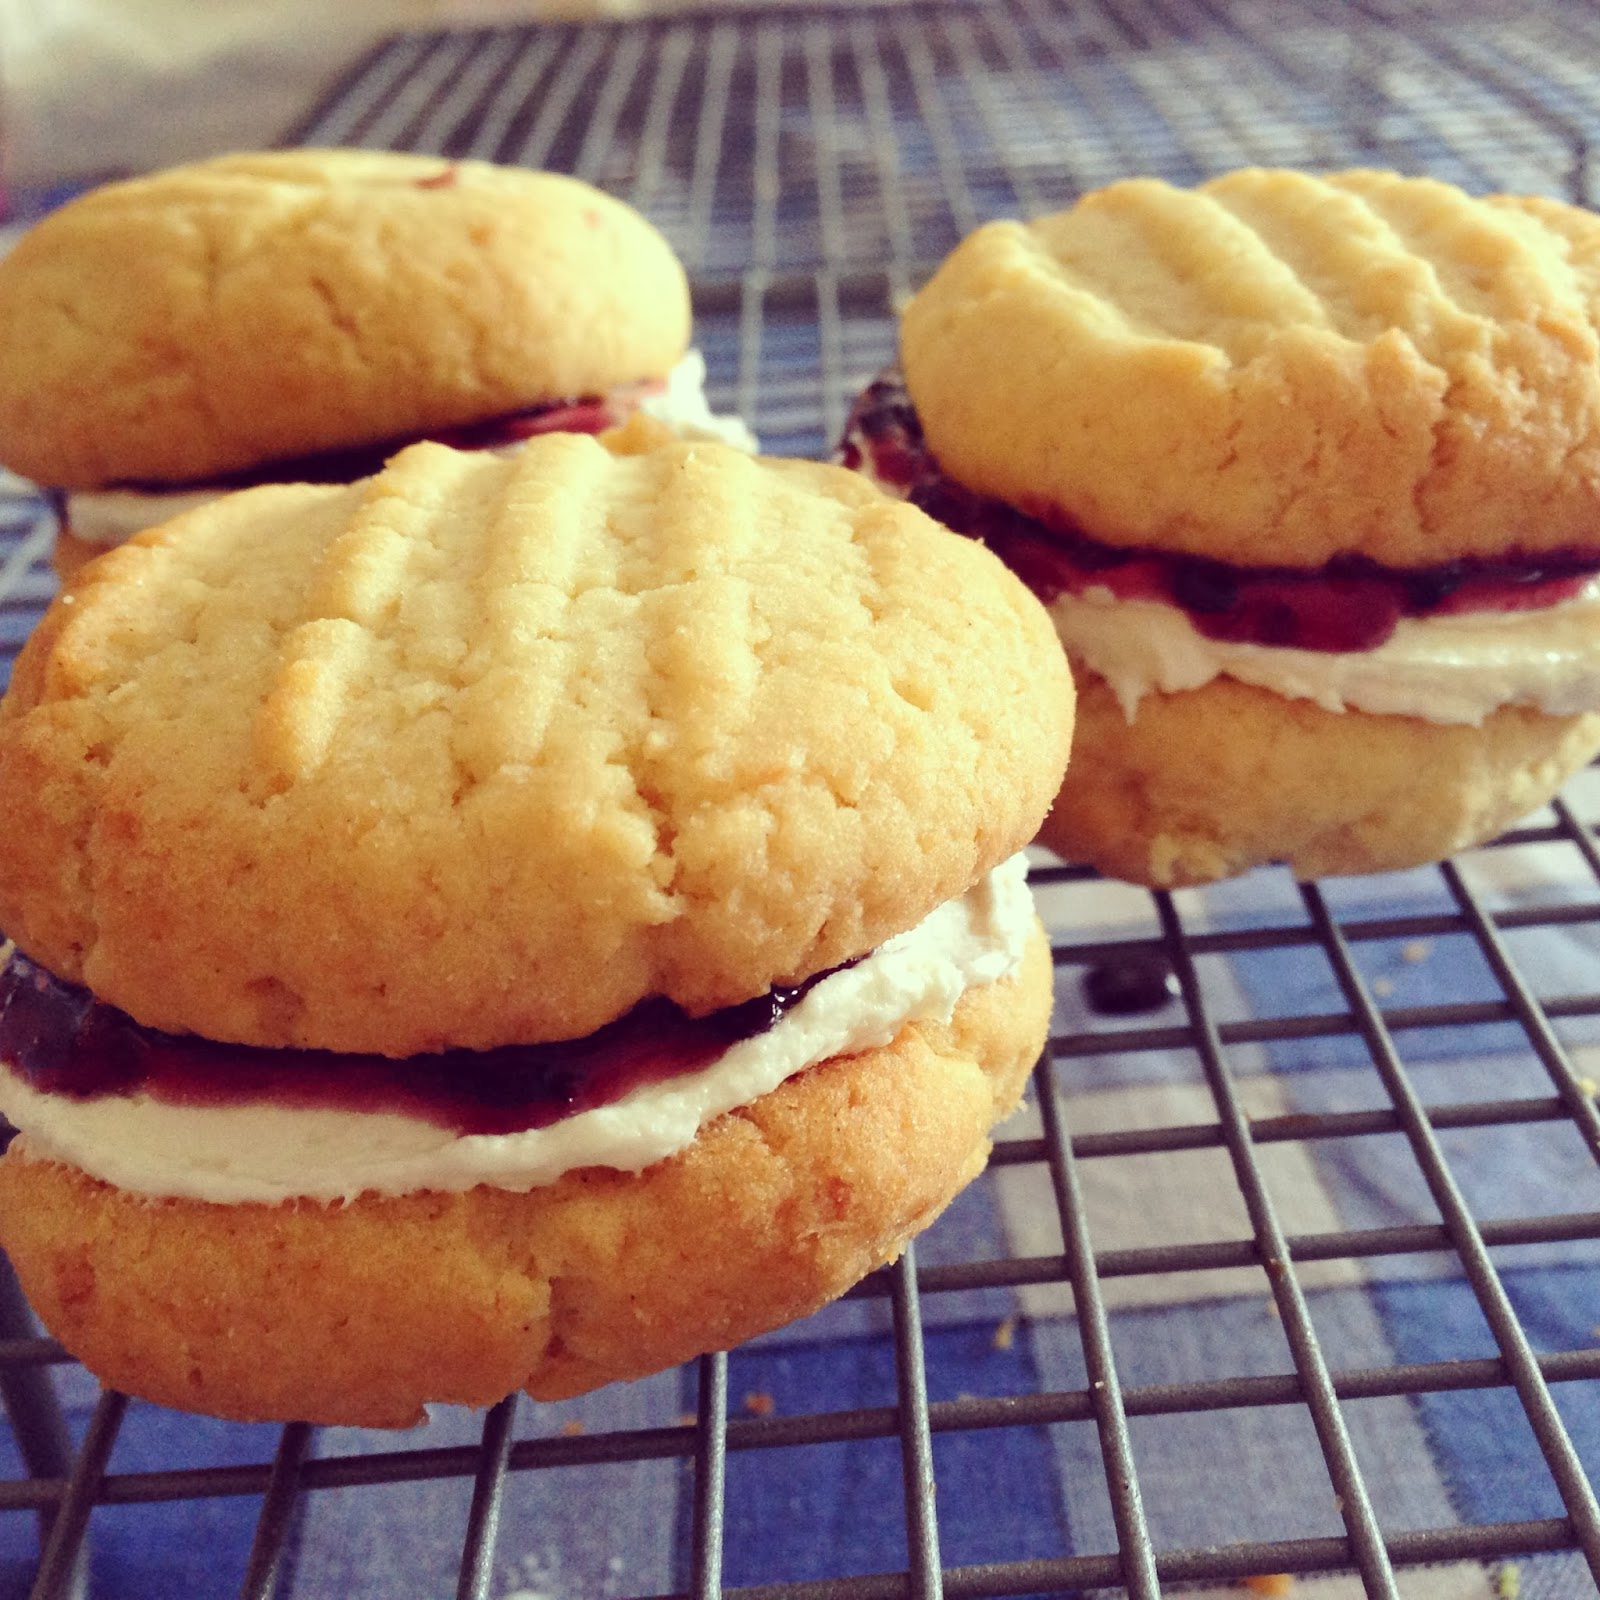
I actually don't like Monte Carlos, but these ones are a different biscuit entirely. Soft and crumbly biscuit, with sweet cream and ever-so-slightly tart mulberry jam filling they are infinitely more desirable. Once you've had them you'll struggle to go back to their mass-produced cousin.

Use whatever jam you have to hand. I happened to have a jar of mulberry from Fratelli Fresh just calling out to be used. Raspberry would be traditional of course.

[biscuit]
  • 190g butter, softened
  • 125g brown sugar
  • 1 tsp vanilla essence
  • 1 egg
  • 150g self raising flour
  • 100g plain flour
  • 1/4 tsp bicarb soda
  • 75g desiccated coconut
[filling]
  • 75g butter, softened
  • 1/2 tsp vanilla essence
  • 2 tsp milk
  • 190g icing sugar
  • jam
Preheat oven to 180C and grease or line 2 large baking sheets.

Cream butter, sugar and vanilla with an electric mixer. Add the egg.

In a bowl, combine the flours, bicarb and coconut. Add this to the butter mixture spoon-by-spoon, beating slowly to avoid a mushroom cloud of flour.

Roll small teaspoonfuls of mixture (a melon baller would be the perfect tool for this) into balls and space out on baking sheets. Flatten with a fork to about 1cm thick. Bake 10 minutes until lightly golden. Remove from oven and cool on trays until firm then lift off onto cooling racks.

For the cream filling, beat the butter, vanilla, icing sugar and milk until fluffy. 

Sandwich to biscuits together by spreading with cream and then about 1/2 a teaspoon of jam. 

If you have any leftover cream, it freezes quite well. I had about half left (I was spreading very sparingly and made quite thick biscuits) so am keeping it for next time.


8 December 2013

The Weekly Digest #21

  1. The Michael Kors spring/summer 2014 collection. It's how I want to dress when I grow up. 
  2. Christmas goodie bags. The easiest & most enjoyable gift to put together that's sure to please everyone. I go in for retro treats (recipes to come later this week), but choose whatever suits you best. Try these easy recipes: ratatouille chutney, fairy cakes, ricciarelli, choc-dipped sugar cookies, spiced orange choc-chip cookies, salted caramel shortbread, cream cheese hazelnut brownies, pecan pralines and white-choc lemon truffles.
  3. Interesting roasts. Turkey is all well and good for Christmas dinner, but maybe we should spice things up a little this year? Try these festive updates: Guinness & honey glazed pork, beer & black pepper beef, Moroccan spiced chicken, maple-mustard pork and bacon & rosemary lamb.
  4.  Are you a master Instagrammer? Wondering if those snaps can be put to good use? Why not have them printed up by kikki.K to use as highly personalised stationery. 

25 November 2013

The Weekly Digest #20

  1. Kaelen's spring/summer collection. Adore the graphic prints on quirky, sporty shapes. Coveting everything - from the easy basics too the special printed pieces. 
  2. Lace table runners. I saw a picture on Pinterest and my heart was stolen. Etsy, Ebay and Vinnies will be the place to find one I feel. And hopefully just in time for my Christmas party this weekend.
  3. And that brings me to my next major thought this week: Christmas! I admit, my tree has been up for weeks (I got excited) and I have been wholeheartedly planning a Christmas party. I have endless lists and ideas...
  4. Passionfruit. Maggie Beer's banana & passionfruit pavlova in her new book started it. Since then I've become a little obsessed with the stuff. I've unearthed endless recipes! These would be some favourites that I can't wait to try: coconut meringue sandwiches with passionfruit ice cream, coconut rice pudding with passionfruit & banana, passionfruit puddings, passionfruit eton mess, passionfruit tart, orange & passionfruit yoyos, and passionfruit & ricotta cheesecake.  I know, long list.
  5. The December issue of (Australian) Vogue. Arizona Muse is to die for.

17 November 2013

The Weekly Digest #19

  1. The five rules of feminist cooking. Inspired by Nigella of course.
  2. J. Mendel's spring/summer 2014 collection. The mix of hard, edgy lines and lace is a perfect match.
  3. Cleansing Oils. They're the new it-product in skincare and I'm hooked! I've started using Nude Skincare's Perfect Cleanising Oil (available at Mecca Cosmetica) and after a fortnight I can really feel the difference. It's a strange way to cleanse, and I'm still getting used to it, but I really love it.
  4. Pecans - I love them and try to include them in lots of my baking (from simple cookies to luscious breakfast muffins). I challenge you not to do the same after trying out these recipes: pecan cream cake, pecan pie ice-cream pie, poppy seed & nut granola, blackberry & pecan biscuits, and triple-choc pecan cookies.
 

15 November 2013

Nigella Challenge: Lemon Gems

If you like lemon, you'll like these. And if you want something a little more refined for afternoon/morning tea than a standard choc chip cookie, then these are perfect. They are super easy and you can whip them up if you have unexpected guests drop by. The curd goes on to a still hot-from-the-oven biscuit.

They may seem a bit strange at first as the curd contrasts A LOT with the shortbread-like biscuit, but it really is a good thing.

I would suggest making your own curd (try this one). I generally make a lemon version of the lime curd in How to be a Domestic Goddess and I always have a jar in the fridge (I love it on ice cream!), but I'm not up to posting it yet! Check your Women's Weekly or CWA cookbooks too - anything old fashioned will have a good, simple recipe. If not, you can buy it in supermarkets (usually near the jam).

The vegetable shortening is necessary. The first time I made these I used it, but the second time I didn't and the difference was obvious. With the shortening the biscuit crumbles wonderfully, as it takes on a shortbread texture that just isn't quite there with the butter. All butter is just a bit to rich. Who'd of thought I'd advocate you not use butter!
  • 125g vegetable shortening, softened (I used copha this time, but you will find other kinds next to the butter in the supermarket fridges)
  • 125g butter, softened
  • 75g caster sugar
  • 1 egg yolk
  • 1 tbsp lemon juice
  • 1 lemon, zested
  • 275g plain flour
  • 50g ground almonds
  • 25g cornflour
  • 6-7 tablespoons of lemon curd
Preheat oven to 180C. Line or grease 2 baking sheets.

Beat together the shortening, butter and sugar. Add the egg yolk, lemon zest and juice. You can use an electric mixer here, but we aren't really creaming so its not necessary - go ahead and give yourself an arm work out.

Fold in the flour, almonds and cornflour. Do this gently - it should be just combined. It's very sticky so it goes in the fridge to chill for an hour.

Remove the dough from the fridge and roll into cherry tomato sized balls. Space these evenly on your baking sheets. Make an indentation in each biscuit (see the picture below). Bake for 20-25 minutes until golden.

The moment they come out of the oven fill the indentation on each biscuit with 1/2 a teaspoon of lemon curd. Then transfer them from the baking sheet to wire racks to cool.


17 September 2013

Nigella Challenge: Ricciarelli

These are fun little morsels. They're like popcorn at the movies, finished before the opening credits have ended. For all their ease of eating, they're a bit of a hassle to make as they need to be started the day before. Though, honestly each step takes no time at all so there is no reason to let the delay stop you. Just try an resist there chewy delight once you've put in a little effort (besides, you can justify th eating with all your hard work).

P.S. Avoid these if you aren't a marzipane fan. It's basically what they are!

  • 2 egg whites
  • 225g caster sugar
  • 1 lemon, zested
  • 1/2 tsp vanilla extract
  • 1 tsp almond essence
  • 300g almond meal
  • icing sugar, for dusting
Line 2 baking sheets with baking paper.

With an electric mixer, whip the egg whites until they are stiff and then gradually whisk in the sugar. It will end up a bit like that weird American marshmallow fluff stuff. Next add the lemon zest, vanilla and almond essence. Then add the almond meal - it will become quite a dense mixture.

Shape tablespoonfuls into diamond shapes and place (evenly spaced) on the trays. It is a sticky mixture, and Nigella suggests dusting your hands periodically with icing sugar while you are shaping. When thats all done, leave the trays out overnight so they can dry out.

Heat the oven 140C, and cook for 30 minutes. They'll be pale and a little cracked when done. It really doesn't matter if they are a little under done as they are a moist, chewy biscuit (I use the term loosely) though over done and they'll start to dry out.

Cool on trays and then dust with icing sugar. They keep really well for a few days in an airtight container, but good luck getting them to last that long!


18 August 2013

Nigella Challenge: Spanish Macaroons

Again, these are not those dainty French pastries, but something rather more robust. They'll be a crowd-pleaser just the same though. Suited to adult tastes, they're named Spanish Macaroons for their warm-spiced orange flavour. They have a sweet chewy centre under their almost-crisp outside, rather like their French cousin. They not look much, but you should never judge a book by its cover!

They're easy to make, but just a little messy (this batter is epically sticky).

  • 425g almond meal
  • 250g  icing sugar
  • zest of 2 oranges (make sure they're nice & firm)
  • 1/2 tsp almond essence
  • 1/2 tsp cinnamon
  • 1 egg
  • 3 egg whites
Preheat oven to 180C and line two baking trays (ones you'd use for biscuits).

Combine almond meal, icing sugar, zest, essence and spice in a mixing bowl. Beat together the whole egg & egg whites in a jug (just to combine, no real aeration is needed). Make a well in the centre of your dry ingredients and pour in the egg. Use your hands to mix - they're only going to get messy anyway!

Break off walnut-sized pieces of mixture (about a tablespoonful for those unaccustomed with whole walnuts) and roll into little balls. Place on your baking trays (about 3-5cm apart, they don't really grow). 

I found (and Nigella suggested) that if you rinse your hands frequently under cold water to remove excess mixture you'll have a far easier time of it. A pain I know, but these little delights are well worth the effort.

Cook in the oven for 20 minutes until lightly golden. Cool on a wire rack before gobbling up.


12 August 2013

Nigella Challenge: Pistachio Macaroons

Like the coconut macaroons, these are not tricky and stressful like those beastly little French delights. They are really only of that style. If you see the picture in the book, you can see that there is no need for elegant perfection here. They will still take a little time and effort, but its nothing compared to a Zumbo recipe I once attempted!

They are however elegant in their own way. I think its the colour; such a pretty shade of green. And God, do they taste amazing!

[macaroon]
  • 75g pistachios
  • 125g icing sugar
  • 2 egg whites
  • 15g caster sugar
[buttercream]
  • 55g pistachios
  • 250g icing sugar
  • 125g butter, softened
Preheat oven to 180C. 

Grind pistachios in a food processor along with the icing sugar (to stop it becoming oily), until it is a very fine dust. This takes a little while, but just be patient. 

Whisk egg whites to stiff peaks, add caster sugar, and whisk again to combine (be careful not to over beat them, but don't be too cautious at the same time - it just needs to be at the tipping point). Fold in the pistachio dust, gently combining. Pipe (or you can just spoon; I did) small circles of mixture out using a plain 1cm nozzle. Make sure you have an even number (you should get about 40 circles)! Let them sit for 10-20 minutes (depending on you weather - if its humid it will take a little longer) to form a skin.

Cook in the oven for 10-12 minutes until they're set (ie, they have that nice crust). Don't worry about cracks or anything like that. I can tell you that Nigella's have them! Leave them to cool on the baking trays while you make the buttercream.

Grind the nuts and icing sugar as you did before. Cream the butter and sugar with an electric mixer. Add the nut dust with the mixer still going.

Use this to sandwich the macaroons together. 


29 July 2013

Nigella Challenge: Coconut Macaroons

I made a mini version of these as I was taking them into uni to share with one of my tutorials, and I actually think I prefer them this way! I ate these big, coconutty, English bakery macaroons when I was in the UK and they were good, but the mini ones have less of the soft centre and more crunch which I preferred. Each to their own though, so try them both ways and see which you prefer.

I can make these at the drop of a hat as I generally have everything in the pantry. Which is good for you, as there'll be no tracking down exotic ingredients or standing confused in supermarket aisles.

P.S. Don't see macaroons and freak out. These are nothing like the fancy French macarons.

  • 2 egg whites
  • 1/4 tsp cream of tartar 
  • 100g caster sugar
  • 30g ground almonds
  • 1 tsp vanilla extract (or coconut essence if you're that way inclined)
  • 250g shredded coconut (not desiccated. It has to do with the moisture - shredded has more)
Preheat oven to 170C and line a large baking sheet (or two if you're making mini ones).

Beat egg whites until frothy (not peaks, they'll be a white foam), then add cream of tartar and keep on beating to soft peaks. Add sugar a scant spoonful at a time, beating away until the peaks are shiny and hold their shape. 

Fold in the almond meal, vanilla and coconut. It is ridiculously sticky, so basically kids will love this and you can let them get messy instead. 

For mini ones, you'll want about a teaspoonful of mixture, but for normal sized ones they should be about 6cm in diameter (think about the size of a mandarin). Keep them nice and round, flattening only a little so they sit well on the tray. Space them out evenly, but don't worry to much as they don't change shape during cooking.  

Cook 20 minutes (a little less for mini ones - just keep an eye on them), until they're lightly golden.


16 July 2013

Nigella Challenge: Rosebud Madeleines

Ever had a madeleine? I had, and I assumed there must be something tricky to them becuase something this simple couldn't possible be this good! Luckily I was wrong, and madeleines are really quite basic. The only interesting bit of kit you need is the tin (get one here, here or here, or just check out any good kitchenware store). And I do recommend this, as they really aren't worth making otherwise. A digital scale could be handy too if you don't have an ordinary one that goes up in small enough increments.

Aside from that, they can be quite versatile. Not a fan of rose? Replace with some other flavouring - orange blossom water would be the obvious place to start, but you could try anything from the vast variety of citrus to classic vanilla or tropical coconut. Just become familiar with the essences shelf in the supermarket, or even the weird looking liqueurs at the bottle shop hidden away on the very top or bottom shelves. (I must confess I never have tried these with anything but rose as I find it most delicious!)

  • 50g unsalted butter, plus extra tbsp for greasing
  • 1 egg
  • 40 caster sugar
  • 45g plain flour (or Italian 00 if you can)
  • 1 tbsp rosewater
  • icing sugar, for dusting
  • a madeleine tin (either 12 or 24 hole mini tin)
Melt butter (on stove over low heat or in short blasts in the microwave). Set aside.

Beat eggs and caster sugar with an electric mixer until its thick (like mayonnaise - the proper stuff). Sift in the flour, and fold in gently with a spoon. 

Set aside a tablespoon of the melted butter, and add the rest to the batter along with the rosewater. Mix well, but gently (I know right, but you get what I mean - we don't want to beat the crap out of it). Rest in the fridge for an hour, the  take out and rest at room temperature for 30 minutes. 

Preheat oven to 220C.

With a pastry brush, coat the insides of the madeleine tins with melted butter. This mixture makes enough for 24 mini madeleines, or 12 ordinary sized ones. Divide the batter evenly between holes, about a teaspoonful for the mini ones, or 2 for the full sized (it spreads quite a lot, so don't worry about how little each seems to have). 

Bake for 3-5 minutes. They should be lightly golden at the edges and spring back when lightly pressed.  Turn out to cool on a wire rack. Dust with icing sugar to serve.


P.S. Apologies for the awful photos. I can assure you these are far prettier and delicate looking in real life!

25 March 2013

Lemon Shortbread

My usual Friday night boredom set in (I really should be more social) and inspired by the last Masterchef masterclass of the season I dived into my cookbook cupboard in search of baking delights. Preferably something I won't want to eat all of at once (ie: chocolate cake). I settled on shortbread with a lemony twist as I still have a bowl-full of them thanks to Mother-dearest. Lovely homegrown ones so full of juicy flavoursome goodness. And of course I'll share with you lot!
  • 2 lemons 
  • 2 cups plain flour
  • 1 cup rice flour
  • 1/3 cup caster sugar (plus some for sprinkling)
  • 220g butter, soft
Preheat oven to 130C.

Mix dry ingredients together in a large bowl. Add the zest of one lemon to mix. Cube butter and rub into dry ingredients. Add juice of both lemons. If the dough won't stick together add a little more butter.

Remove from bowl and knead until smooth. Roll out to 0.5-1cm thick and cut into rectangles. Place on lined baking sheets. Prick with a fork (yes, you can make pretty patterns if you want to!) and sprinkle with a little extra caster sugar just to make them look 'profesh' (totally a word according to Urban Dictionary).

Bake for 30-45 minutes. Depends on how golden you like them, they should still be very pale to be cooked correctly. Mine turned out a little overcooked last night... woops. 

Best enjoyed with a strong, milky tea such as my fav Irish Breakfast! Although for the afternoons a lighter Darjeeling or Earl Grey (to pick up on that citrus) while reading about Louboutin in GW sunning yourself on a balcony is highly recommended!  


    Shoes and shortbread = Afternoon Delight!

    22 March 2013

    Brownie Cookies w/ Peanut Butter Frosting (aka heaven)

    VINTAGE POST:

    Ok, so I'm diving straight into the ingredients here because I'm so excited to share these with you. They are the MOST INDULGENT FOOD EVER! Thank you so, so, much Donna Hay.
    • 350g chocolate (All or mostly dark is best. Chop if using a block.)
    • 40g butter
    • 2 eggs
    • 2/3 cups caster sugar (150g)
    • 1 tsp vanilla extract/essence
    • 1/4 cup plain flour (35g)
    • 1/4 tsp baking powder
    So, preheat your oven to 180C. Melt 200g of the chocolate and butter over low heat, until smooth and glossy. Set aside.

    So I had to hand whisk this next step, but do use an electric mixer because it you'll still be able to use your arm afterwards. Whisk eggs, sugar and vanilla until pale and creamy (approx. 15 minutes - longer if you're doing it by hand). Stir through the sifted flour and baking powder. Add the melted chocolate, and the remaining chocolate (buttons, or chopped pieces).

    Stand for 10 minutes - this thickens it up. 

    Spoon tablespoon amounts onto lined baking sheets. Really space them out (I didn't and they turned into a giant cookie sheet...). And make sure you have an even number so you can sandwich them. Bake 8-10 minutes until puffed and just cracking on top. Cool on trays. 

    Now, this next bit is super, super amazing. Peanut butter frosting is now essential for life to continue as normal!
    • 1 cup icing sugar (160g)
    • 1 cup smooth peanut butter (You could use crunchy for an extra kick. Nutella is also good for a hazelnut variation.)
    • 80g butter
    • 1 tsp vanilla extract/essence
    • 1/3 cup pouring cream (80ml)
    Beat sugar, butters and vanilla until light and fluffy (again hand-mixing is a crazy idea...but do-able). Add cream and beat further 2 minutes. Spread the base of a cookie with the frosting, then sandwich together with another (bare) cookie. Continue until you've used them up (and try not to eat them straight away!). 


    That last picture is from Donna Hay - shows what they should look like, rather than my massive sheet of brownie goodness. This recipe is in the current issue of Donna Hay magazine, and can be found on the website.